Everything But The Dutch Oven

The mission: find as many different recipes as possible that all call for basic baking ingredients: flour, yeast, baking powder. Baking Basics is a fun cooking challenge I’ve been on since moving to Russia and today’s installment features two favorites of gluten lovers everywhere: artisan bread and homemade biscuits.

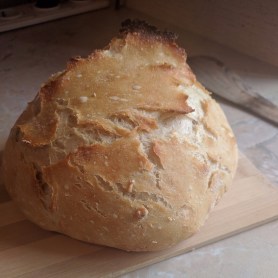
Luke and I have been making our own bread since we got married 2.5 years ago. However, we usually employed a bread machine so we could come home to the delicious wafts of freshly cooked bread meeting us at the door.  Without our plethora of appliances, I went back to making bread the old-fashioned way–in the oven.  Here’s how to make artisan dutch oven bread without a dutch oven:

img_20171112_124059.jpg

INGREDIENTS

  • 3 cups all-purpose flour
  • ½ teaspoon active yeast
  • 1¾ teaspoon sea salt
  • 1½ cups warm water
  • 1 Tablespoon minced fresh rosemary

INSTRUCTIONS

  1. Combine flour, yeast, salt, water in a bowl. Stir until combined. Cover with a towel or plastic wrap and let dough sit on the counter overnight, or for at least 12 hours.
  2. When ready to make the bread, place an enamel oven-proof stock pot in the oven at 180 degrees Celcius while the oven preheats, around 30 minutes. While  the pot is heating up, transfer dough to a floured surface, it will be bubbly and sticky. Add a little flour and gently fold and tuck it into a round ball (it will still be a pretty loose dough). Using oven mitts, carefully take the hot pot out of the oven, add just enough oil to cover the bottom of the pot (olive, sunflower, vegetable whatever) and drop the ball of dough into the hot pot. Cover with the lid and place back into the oven to bake for 25 minutes..
  3. After 25 minutes, rotate the pot, remove lid and let it bake another 15 minutes or until brown.

NOTES

Recipe adapted from http://www.nutritiouseats.com/rosemary-dutch-oven-bread/

RESULTS

Wonderfully fluffy and flavorful bread that is perfect with lentil soups.

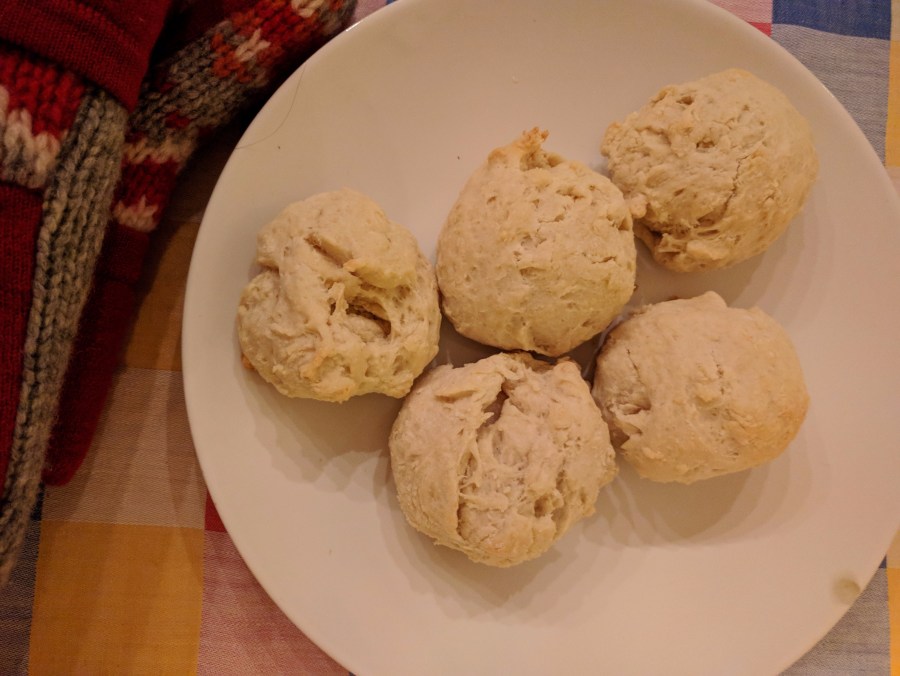
Another recipe recommended by a friend was the classic biscuit.  The only glitch with this recipe was it calls for buttermilk which very well might be available for purchase at my local grocery store, but I have no idea what buttermilk is in Russian.  Instead, I used my trusty trick: add 1 TBS white vinegar per cup of milk and let it sit for 5 minutes.  Voila!  Buttermilk biscuits without the buttermilk.

img_20171025_183311.jpg

INGREDIENTS

  • 3 cups all-purpose flour
  • 1 teaspoon salt
  • 1 tablespoon baking powder
  • 2 tablespoons sugar
  • 4 to 6 tablespoons butter
  • 1 cup milk + 1 TBS white vinegar

INSTRUCTIONS

  1. Preheat your oven to 220 degrees Celsius.
  2. Add 1 TBS white vinegar to 1 cup milk, let it sit for 5 minutes.
  3. Mix together the dry ingredients. With two knives, a pastry blender, or your fingertips, cut or rub the butter in  until the mixture looks like bread crumbs.
  4. Add the liquid all at once, mixing quickly and gently for about 20 seconds until you have a soft dough.
  5. Drop the dough by the spoonful onto a lightly floured baking sheet.
  6. Bake the biscuits for 15 to 20 minutes, until they’re lightly browned. Remove them from the oven, and serve warm.

NOTES

Recipe adapted from https://www.kingarthurflour.com/recipes/baking-powder-biscuits-recipe

RESULTS

Fluffy, not too sweet, biscuits that warm up a Russian winter, especially when served hot with butter and honey.

Hey Sugar, Sugar

Baking is my love language.  It’s how I love myself by providing time to play with dough and decompress by kneading the heck out of bread.  It’s also how I try to love others, by pumping them full of sugar and carbs.  Who wouldn’t want to be my friend?

Fun fact: I thought I was a good student in high school but had several teachers tell me they gave me A’s because I brought in baked goods.  Were they kidding?  Probably.  But you never know…

We’ve been living in Russia for three months and once I got a lay of the grocery store land, I figured I’d have to hang up my baker’s hat for the time being.  A lot of the ingredients I was used to relying on (vanilla extract, chocolate chips, nuts, etc…) were hard to find.  Plus my gas oven is persnickety and I only have one oven-safe baking dish.

I’ve decided to rise to the challenge instead.  I asked you guys a few weeks ago for your favorite recipes that don’t require a lot of fancy ingredients and you delivered!  I’ll be trying them all out (full list found here) and sharing the recipes and adaptations on the blog.

Without further ado, today’s baking basic is the classic sugar cookie.

Ingredients:

  • 2 1/2 cups all-purpose flour
  • 3/4 teaspoon baking soda
  • 1 teaspoon baking powder
  • ½ teaspoon salt
  • 1 ½ teaspoon vanilla sugar
  • 1 cup unsalted butter
  • 1 1/4 cup granulated sugar
  • 3 egg yolks
  • 1/4 cup granulated sugar, for rolling

PRE-STEP: Preheat oven to 350F degrees. Wipe baking dish down with butter wrapper. Set aside.

STEP 1: Stir together the flour, baking soda, salt, vanilla sugar and baking powder in your large bowl, then realize you need the large bowl for the next step and dump it into a medium size bowl. Set aside.

STEP 2: In a large bowl, cream together the butter, and granulated sugar until combined using all the arm strength you’ve got.


IMG_20171018_183353STEP 3: Add egg yolks.

STEP 4: Add flour mixture and mix until just combined.  You won’t overmix it, because your biceps are exhausted.

STEP 5: Using your hands, scoop dough into balls about 2 tablespoons each, roll in sugar and place onto prepared baking dish.

STEP 6: Bake for 9 minutes, rotate pan to compensate for oven unevenness, then bake for 8 more minutes. Let cool for 5 minutes on baking sheet before moving them to a makeshift egg carton cooling rack.  Let cool completely or eat immediately.

This recipe was adapted from Soft Sugar Cookies by Deliciously Sprinkled.

Luke ate 6 of them in an hour, so I say they are a success!  Crispy on the outside with a soft middle. Next up: buttermilk biscuits with no buttermilk and dutch oven artisan bread without a dutch oven.

365 Days Later

If I’m reading my Facebook news feed correctly, everyone graduated this weekend. Congrats! I personally had the pleasure of jetting up to San Francisco and watching my talent sister receive a well-deserved Bachelors of Fine Arts. Pretty sure she exerted more energy in a week of dance classes than I did in my entire 4 years of scurrying across my square mile campus.

It’s cliche, but true, that it’s hard to believe an entire year has passed since I too sweated in a black hospital gown and tried to keep my cap from escaping off my head (my hair has a mind of its own and didn’t like the competition).

Other than telling you how awesome my sister is, I don’t have a great thesis for this blog post but I’ve been in a reflect-y mood lately and figured other recent alums might be in the same boat.

Side Note: I’ve noticed lately that I over-hyphenate. See last 2 sentences for examples. Not sure when this started, but every time I read something I write I find at least 5 unnecessarily hyphenated words. I’m considering removing the worn-out punctuation mark from my keyboard. Just did it again. Unbelievable.

Post-college life has been far better & far worse than I imagined. Off the top of my head, below are my top unexpected life lessons from the last 12 months.

1. Keeping yourself alive (without spending a fortune) isn’t as easy as it seems

Most recent college grads don’t have $500 to blow on food each month. Limited grocery budgets means a lot of planning, home-cooked meals, and leftovers. Some weeks, getting food on the table EVERY SINGLE DAY takes more strategy than a pro chess game.

2. Evenings are the BEST

In college, there is no clocking out. Study, sleep, shower and repeat dominate your schedule. Once other people start paying you to do work instead of you paying to volunteer your free labor, you can actually stop working. In fact, it’s recommended if you want a working lifespan of longer than 3 month stints.

3. Everything changes but then it doesn’t.

The first few months out of college were a Wizard of Oz level tornado. Getting married, moving across the country, new job, car insurance, realizing you grossly overpaid for car insurance 3 months later, the list of “real world” acclimating to-dos felt endless. Until it ended. And then you feel sadly nostalgic and wonder why your life doesn’t change dramatically every semester anymore.

Three?! That’s all I could come up with after moving cross-country, new jobs, weddings, innumerable finger cuts from bulk slicing onions, and dozens of conversations with post-grad friends?!

I need your help, guys. What have you learned in this past year (or years) of finding our own little corners of the world?

Hands Free Dinner (3/3)

For my last installment on how to make dinner as easily as possible, without going unhealthy or expensive, here are my final tips:

1. It’s OKAY if you don’t have all the ingredients.
Substituting white potatoes for golden ones is totally fine. You don’t even have to tell anyone.

2. Invest in appliances
Our favorites? Rice cooker, crockpot, and bread machine. Delay timer is our new best friend.

3. PLAN AHEAD
I’ve found that the most expensive or unhealthy meals are the unplanned ones. You don’t have much time, so you grab something on the road or on the way home and it’s guaranteed to be more expensive than if you made it yourself. So plan your meals, and check your meal calendar before going to bed so you can de-frost any pre-made foods (crockpot meals, meats, spaghetti sauce, etc…)

4. Identify your meal staples

Planning out 2 weeks of food is so much easier when some days are on auto-fill. For example, Wednesdays are leftover days and Thursdays are for spaghetti. Of course, it’s great to add variety into your menu so I wouldn’t recommend having the same thing every day, but adding at least 3 days of consistency makes planning meals and making them stress-free.

Thanks for joining me on our hands-free food foray! Any tips of your own to add? Comment below!

Until dinner,
Chloe

Hands Free Dinner (2/3)

I promised you all an update on my grand hands-free dinner experiment and I’m glad to report: So far, super easy, super successful. We have a few favorite recipes and not-so-favorite ones but all the meals have been yummy, edible, and best of all–so efficient! There is really not much better than coming home from work with dinner already made. We also invested in a small rice cooker with a delay timer so there is literally nothing else to do but serve yourself some delicious pre-cooked grub.

I also promised some of my more general tips on how to eat good, healthy food on a budget. While making this list, I realized I had too many for just one post so stay tuned! More culinary craftiness to come.

Tip #1: Buy in Bulk. Always.

Whether you’re single, married, or have 10 kids, bulk just makes sense. For those of us in 1455221148.pngthe 2 and under households, this doesn’t mean buying all your fresh produce in bulk. Here are the staples that we’ve found save money and trips to the grocery store –>

The first time you do this, the bill will be upwards of $250. DON’T PANIC. You will only have to replace these items every few months, so the overall bill is significantly less.

Tip #2: Switch convenience for cheapness

What is easier? Opening a can of beans, ready to throw into a soup or soaking them overnight for 10+ hours and then cooking them for another 2-4? Convenience sells which is why I am convinced grocery stores make most of their profit off of individual-serving and pre-made foods. Don’t spend an extra $5 on adorable individual servings. Buy a box of 150 Ziplock sandwich bags, and make your own.

Tip # 3: Say goodbye to snacks and sandwiches

For the BLT lovers out there, this one is hard (I feel your pain). What is lunch without a sandwich? The reality is, deli meat and sliced cheese is costly. And snacks can be pretty pricey simply because they are easy to grab off the shelf in the store and your pantry (see Tip #2). By doubling the size of your dinners to make enough leftovers for the next day, you can have delicious and healthy lunches all week long. The additional cost to make more of a meal you’re already prepping is far less than buying sandwich supplies and snacks.

More to come!

Until then,
Chloe